Introduction to the Arduino
About ten years ago, I received my first Arduino Uno development board. I quickly discovered an incredible tool in the Arduino Platform. Ever since, it’s been an essential part of my DIY projects, playing a central role in creations that ranged from mouse traps to solar tracking systems.
The Arduino has an extraordinary ability to interconnect the digital and physical worlds. It has consistently enabled me to turn my most complex ideas into tangible realities. It’s like having an entire cosmos of possibilities tucked into a compact little microcontroller board.
Through the years, I’ve seen the Arduino platform evolve and become an integral part of many creations, not just my own. Its user-friendly interface and flexibility have won the hearts of both hobbyists working on garage projects and professionals creating cutting-edge robotics. Today, Arduino’s significance in the field of IoT, electronics, and robotics is unparalleled.
Whether you’re an experienced maker or a curious novice ready to explore DIY electronics, Arduino opens up a world filled with opportunities and a supportive community.
What is Arduino?
At its core, Arduino is an open-source electronics platform that uses simple hardware and software. Its primary goal is to democratize electronics – making it accessible to everyone from hobbyists and artists to professionals and engineers. The Arduino project took off in Ivrea, Italy, in 2005. It provided students with an affordable and straightforward way to create devices that interact with their surroundings using sensors and actuators.
Being open-source implies that anyone can examine, modify, and improve the Arduino’s code. This openness has fostered a culture of collaboration and sharing, leading to a diverse range of projects and applications.
Understanding Arduino Boards
The heart of the Arduino platform lies in its boards. These microcontroller-based kits are designed to build digital devices and interactive objects capable of sensing and controlling both physical and digital environments. A plethora of Arduino boards are available, each tailored for different project complexities and types. However, here are some variants that are particularly popular among beginners due to their versatility and user-friendliness. These include:
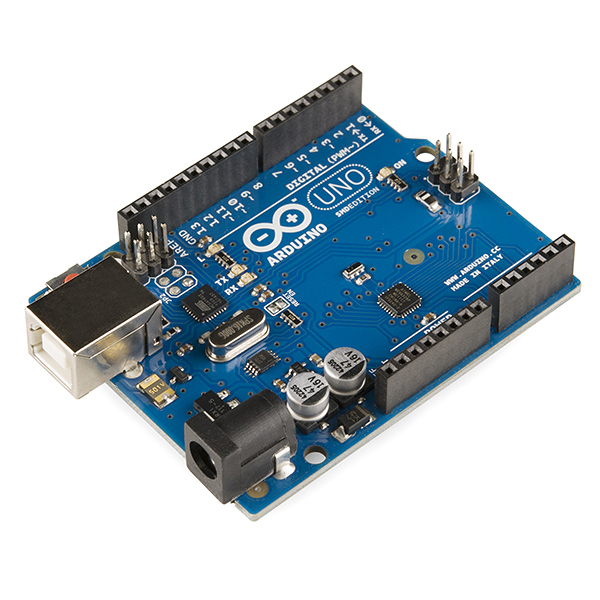
1. Arduino Uno (R3)
2. Arduino Nano
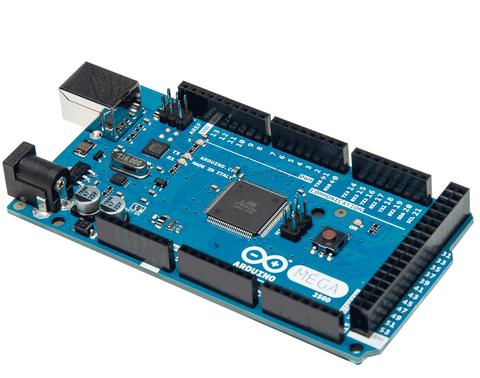
3. Arduino Mega (2560)
4. Arduino Leonardo
5. Arduino Micro
6. Arduino Due
To help you understand the unique features and capabilities of each board, here’s a comparison table showcasing their specifications:
| Arduino Board | Microcontroller | Operating Voltage | Input Voltage (recommended) | Digital I/O Pins | Analog Input Pins | PWM Digital I/O Pins | EEPROM (bytes) | Clock Speed |
|---|---|---|---|---|---|---|---|---|
| Uno (R3) | ATmega328P | 5V | 7-12V | 14 | 6 | 6 | 1 KB | 16 MHz |
| Nano | ATmega328P | 5V | 7-12V | 14 | 8 | 6 | 1 KB | 16 MHz |
| Mega (2560) | ATmega2560 | 5V | 7-12V | 54 | 16 | 15 | 4 KB | 16 MHz |
| Leonardo | ATmega32U4 | 5V | 7-12V | 20 | 12 | 7 | 1 KB | 16 MHz |
| Micro | ATmega32U4 | 5V | 6-20V | 20 | 12 | 7 | 1 KB | 16 MHz |
| Due | SAM3X8E | 3.3V | 7-12V | 54 | 12 | 12 | N/A | 84 MHz |
**Note:** The above specifications are average values. For precise specifications, it’s best to refer to the datasheets of the respective boards.
Each Arduino board has a unique set of features, making them suitable for different applications. For example, the Arduino Mega 2560, with its expansive number of I/O pins and larger EEPROM, is perfect for complex, large-scale projects. Conversely, the compact Arduino Nano and Micro are ideal for projects where space is a significant constraint.
Despite their differences, all these boards embody the core principles of the Arduino platform – simplicity, openness, and a supportive, dynamic community. Therefore, no matter which board you choose, you’re entering a realm of limitless possibilities.
Arduino IDE: The Programming Environment
The Arduino Integrated Development Environment (IDE) is the primary tool used to program Arduino boards. It’s a free software, compatible with Windows, MacOS, and Linux. The IDE is where you’ll compose your code, which is then uploaded to the Arduino board. Arduino code structure revolves around two main functions: ‘setup()’ and ‘loop()’. The ‘setup()’ function is used to initialize settings, while the ‘loop()’ function contains code that is executed repeatedly.
Basic Arduino Syntax and Programming Concepts
Don’t worry if you’re new to programming; Arduino’s simplicity makes it easy to get started. Basic programming concepts such as variables, control structures (like loops and conditionals), and functions are all part of writing Arduino code. Arduino also comes with a comprehensive set of built-in libraries, offering additional functionality and making it easier to interact with specific hardware.
The Journey Ahead
Arduino opens up a universe of possibilities for makers, and this introduction is just the tip of the iceberg. As you become more comfortable with the platform, there are numerous advanced projects to tackle. The global Arduino community is also an excellent resource for learning, sharing, and collaborating.
Conclusion
The Arduino is more than just a piece of hardware or software. It’s a passport into the expansive world of making, coding, and electronics. As you embark on this journey, I hope you’ll find, as I did, that the path is incredibly rewarding.